DIY Candle Making With Paraffin Wax: Simple, Affordable & Fun

So are you planning to produce your candles from scratch? Then, you've come to the right spot. Today, we'll walk you through all you need to know to get started creating paraffin wax candles at home.
When most people think of wax in any form, they presumably think of paraffin wax. It is one of the most common and versatile waxes used today.

Semi Refined Paraffin Wax is also the most affordable and widely accessible wax for candle making. In its raw form, it is a white, odorless, tasteless, "waxy" solid with a normal melting temperature of around 110 to 150 degrees Fahrenheit, and while it is highly inert, it burns effectively.
Benefits of Paraffin Wax For Candle Making
When most people think of wax for making candles, they presumably think of paraffin wax. It is one of the most common and versatile waxes used today for candle making. Have a look at some of the benefits:
- Excellent Hot Throw: While the paraffin candle burns, it emits a wonderful scent into the air. Its good hot throw makes the candle scent strong not just after burning but even as it is.
- High Fragrance Load Allowance: Since paraffin wax can hold a greater fragrance load, we can cram a more powerful, longer-lasting scent into it than we could with soy or beeswax. When paraffin wax candles are burned in a room, the scent usually covers the space within 15-20 minutes.

- High Color Range: Paraffin Wax is colorless, so it is quite versatile in nature, which means you can make handmade candles of any color using this wax and mica colorants or candle dyes.
- Great Adhesion: Paraffin wax is the most effective viscosity regulator, capable of lowering the melting viscosity, increasing fluidity and wettability, increasing bonding strength, preventing caking in hot-melt adhesive, increasing surface hardness, and lowering cost.
- Fully Customizable: Paraffin wax is quite versatile, making sit easily customizable. This wax can be used for making decorative candles like pillar candles, tealight candles, jar candles, etc.
Homemade Candle Making With Paraffin Wax - Easy Steps
Because we have reduced the candle-making process into a few simple stages, the supplied recipe is an excellent guide for both novices and experienced candle-makers. To get started, use the following recipe:

Ingredients For Paraffin Wax Candle Making:
Here is a list of a few essential components required for manufacturing Paraffin candle wax at home. Gather the below-mentioned items and begin the candle-making process:
- Containers For Candles
- Pre-waxed Candle Wicks
- Semi Refined Paraffin Wax
- Heat-resistant Dish
- Large Pot For Double Boiler
- Spatula
- Rosemary Essential Oil
- Candle Coloring Dyes
DIY Paraffin Candle Recipe - Step-By-Step
There are six steps incorported for making candles at home which you can follow exactly step by step. So lets get started:
Step 1: Prepare the Wax for Melting
By cutting or slicing your paraffin wax, you may make it into bits or shavings. Smaller bits of wax melt faster than bigger portions. If you use smaller portions, this will also ensure that the wax melts evenly.

Half-fill a medium or large pot with water. Make sure the pot has enough room for a smaller container; you'll be melting the wax in an improvised double boiler with the smaller vessel.
Step 2: Wax Melting Process
In a smaller, heat-resistant container, place the paraffin wax chunks or shreds. To create a temporary double boiler, place this larger container inside the larger pot. Please bear in mind that directly exposing candle wax to heat might cause it to catch fire or evaporate.
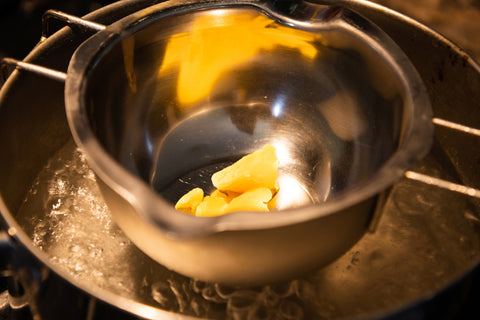
Turn the heat up to high and let the water come to a boil. As the water heats up, the wax will gradually melt. Keep in mind that wax can be difficult to clean; you can purchase a low-cost, heat-safe saucepan to use only for candlemaking.
Step 3: Personalize Your Candle Wax
Essential oils can be used to scent your melted wax. Which scent you pick is totally up to you, though you can go with lavender or vanilla essential oil.
You can find high quality essential oils at VedaOils. It is better to incorporate an essential oil mix into candles since they aid in aromatherapy. Everything should be well mixed together.

Fill it with your chosen candle colour. Because candles are made of water, ordinary food coloring will not work.
Colors that are oil-based, liquid-based, or powder-based can be bought at your local craft store. Specific candle colours are also commonly accessible.
Drops of colour in heated wax until the desired colour is attained. Stir everything together completely.
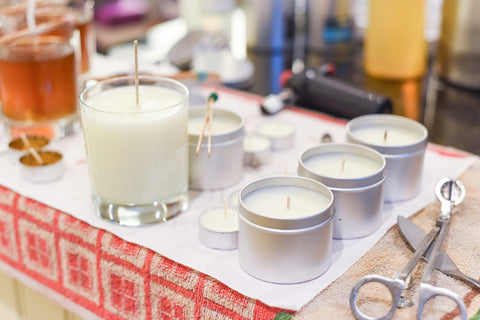
Step 4: Moulding the Wax
Insert a Pre-waxed tabbed candle wick into the centre of the candle mold or candle jars (yankee glass jars or transparent glass jars).
You can also go with tins, mason jars, old teacups, or any other heat-resistant container you have on hand can be used.
The candle wick should be inserted in the center of the candle mold, approximately two inches from the candle's edge. Attach the wick to the bottom of the jar by securing it with the wick tab.

To keep the candle wick in place, use a wick sustained, which hangs the wick straight down into the middle of the mold. Melted wax should be poured into the mold.
Pour slowly so as not to overflow. Take caution not to knock the wick out of the mold by mistake. You get to choose how full your molds should be.
When pouring paraffin wax into molds, please note that it will shrink somewhat after cooling.
Step 5: Let the Wax Cool
Allow them to chill for a full 24 hours if possible. The longer you let them chill, the better they will be. Paraffin candles typically take 24 hours to cool.
Step 6: Light Your Candle Wax

You may simply burn the candle wax once it has totally cooled and solidified. To minimise tunneling, light the candle for at least 30 to 45 minutes at first.
Conclusion
You may bring joy into your daily life by doing a few simple things. One of the simplest is a fragrance candle. Scented candles offer considerable mood-lifting and stress-relieving qualities.
Sure, you must have a lot of lovely candles on your shelf. On the other hand, this recipe is for those who appreciate a good DIY project.
You'll be a DIY candle master in no time with a few low-cost supplies and a little instruction from the crafts pros at VedaOils.
Do you know where you can obtain materials for Paraffin candles? Choose VedaOils because they have the highest quality candle-making components. Then, have a good time making candles.
Frequently Asked Questions
Now that you’ve read so much about paraffin wax, we are sure that you are ready to be the next best candle maker in the town. To help you know a little more about Paraffin wax, read the FAQ’s given below:
Q: Can I mix paraffin and soy wax for candles?
A: Yes, you can easily mix paraffin wax and soy wax for candle making by melting the two waxes together.
Q: Is paraffin wax good for making candles?
A: Yes, Paraffin wax is one of the most common wax for candle making since it is quite versatile in nature and also it has amazing scent throw capability.
Q: What temperature do you add fragrance to paraffin wax?
A: Regardless of the fragrance oil's flashpoint, it is advisable to add fragrance oil to your wax at 185°F. This is the ideal temperature for the fragrance and wax to bond, resulting in the finest fragrance thrown in the completed candle.
You May Also Like:
- Body Wash Recipes For Every Skin Type
- Homemade Lavender Bath Salts Recipe
- Homemade Whip Body Butter Recipe
- Keratin Treatment for Smooth Hair
- Homemade Lip Scrub for Dark Lips

Reviewed by:
Anjali Sharma
Anjali Sharma is a cosmetic & skincare formulation chemist with experience in developing products with over 5 years of experience in the Skincare and cosmetic industry.
Buy Products
-
 ₹249.00 ₹500.00
 -
 ₹339.00 ₹600.00
 -
 ₹129.00 ₹300.00
 -
 ₹99.00 ₹150.00
 -
 ₹99.00 ₹200.00


 Home
Home Search
 Shop
Shop Chat
Chat Profile