How To Make Christmas Soap at Home?

With Christmas right around the corner, you might be in a pickle on what to gift your loved ones, which shows your appreciation, is helpful, and is pocket-friendly. Soap is an evergreen option since it can also be pretty, festive, practical, and affordable. And instead of buying one, why not make them yourself?

A fantastic activity while being affordable and caring. This Christmas soap recipe is easy and fun to make. You'll fall in love with this colorful and aromatic soap. This Christmas soap recipe is highly customizable; choose ingredients according to your requirements and desire, and keep reading to find your following favorite soap-making recipe.
DIY Christmas Soap with Essential oil - Step By Step Recipe
DIY Christmas soap recipe needs to be unique and different, but it doesn't means it has to be complicated. So here is a simple and easy-to-make Christmas soap at home, A DIY recipe.
Ingredients:
- Precise Soap Base - 500 Grams
- Dried Herbs - 1 Teaspoon
- Glitter - 1 Teaspoon
- Oatmeal - 1 Teaspoon
- Soap Colorants - 1 Teaspoon
- Festive Soap Molds - 1 Teaspoon
- Virgin Coconut Oil - 100 ML
- Peppermint Essential Oil - 10 Drops
- Cinnamon Essential Oil - 10 Drops
- Sweet Orange Essential Oil - 10 Drops

Easy Steps To Make Christmas Soap with Essential Oils:
Step 1: Start by melting the soap base. Cut it into small chunks and place them in a microwave-safe bowl. Melt the soap in the microwave or using a double boiler, following the instructions on the soap packaging.

Step 2: Add coconut oil and a few drops of your chosen essential oil for fragrance once the soap base is melted. Stir gently to combine.

Step 3: Add soap colorants to achieve the desired shade. Remember that a little goes a long way, so start with a small amount and gradually add more if needed. Mix well to distribute the color evenly.

Step 4: If you want to add any optional additives, such as dried herbs or glitter, sprinkle them into the soap mixture and stir gently to distribute them evenly.


Step 5: Pour the soap mixture into your festive soap molds. Fill them to the top but be careful not to overflow. Tap the molds gently on the countertop to release any air bubbles.

Step 6: Mist the surface of the poured soap with rubbing alcohol from the spray bottle. This helps to remove any remaining air bubbles and creates a smooth finish.

Step 7: Allow the soap to cool and harden completely. This usually takes several hours or overnight, depending on the size and thickness of the soap molds.

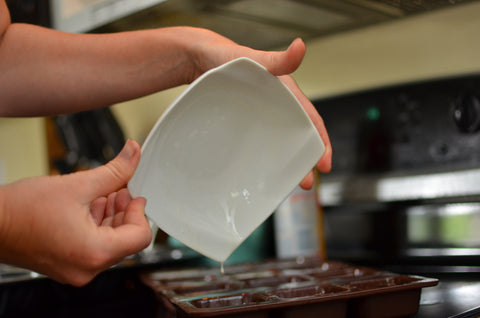
Step 8: Once the soap has hardened, gently remove it from the molds. If you encounter any resistance, place the molds in the freezer for a few minutes to help release the soap.
Step 9: Trim any excess soap or rough edges using a knife or cutter.
Step 10: Wrap the finished soap in plastic wrap or parchment paper to protect it until use or gift-giving.
Safety Tips For Making Christmas Soaps at Home
There are dangers to making Christmas soap at home, but as long as you follow proper safety precautions, you can make soap safely at home. Start with these five simple and valuable tips and tricks.

1. Wear Long, Thick Gloves
To protect your hands, put on thick, lengthy gloves. Medical-type latex gloves are too short and will expose your wrists; they are also too thin and can tear, exposing your skin. Therefore, they are not acceptable.

Rubber gloves for cleaning are longer and thicker. Tuck your sleeves into your gloves so that no skin shows. Because soap residues on the equipment can still contain unreacted lye, gloves must be worn during the soaping process and throughout clean-up.
2. Wear Goggles
Wear eye protection to protect your eyes from lye and soap droplets, which can cause injury or blindness. This is especially important during the mixing process.
3. Wear A Respirator
A respirator mask will keep you safe from lye fumes. The quality of the respirator mask determines the degree to which it will provide protection, but any show is preferable to none because it will block at least some of the vapors.
4. Wear Protective Clothing
Wear protective clothing when producing soap. Because lye and unsaponified soap can damage textiles, it is best to wear protective work clothing rather than everyday clothing. Long sleeves, long trousers, and closed-toe shoes are required as protective apparel to ensure no flesh is exposed.
5. Work In A Well-Ventilated Area
In a well-ventilated area, make the lye solution. If this is impossible, perform the procedure outside (for example, on a balcony) or near an open window while wearing a respirator mask.
Conclusion
You are showing appreciation to your loved ones this Christmas with the information Christmas soap recipe. Remember to use the best quality ingredients, get it from your trusted local shop, or visit us at VedaOils.com. The best in the business of making our customers happy and satisfied. Visit us now and get discounts on your first bulk purchase for your soap-making business.
Frequently Asked Questions
We have compiled a list of frequently asked questions (FAQs) about Christmas soap recipes to help you create beautifully scented and visually appealing soaps for the holiday season. Whether you're a seasoned soap maker or a beginner, these FAQs will provide valuable insights and guidance. Let's dive in!

Q. What ingredients do I need to make Christmas soap at home?
Ans. To make Christmas soap at home, you'll need a soap base (melt-and-pour or cold process), essential oils or fragrance oils in holiday scents like cinnamon or peppermint, colorants (optional), Christmas-themed soap molds, and any additional decorative elements like dried herbs or glitter.
Q. What are the steps to make Christmas soap?
Ans. The specific steps may vary depending on the type of soap base you're using, but generally, the process involves melting the soap base, adding fragrance and colorants, pouring the mixture into soap molds, allowing it to cool and harden, and then removing the soaps from the molds. Finally, you can decorate the soaps with additional elements if desired.
Q. How long does it take to make Christmas soap at home?
Ans. The time required to make Christmas soap will depend on the type of soap base you're using and the complexity of your design. The process typically takes a few hours for melt-and-pour soap, including cooling time. Cold-process soap requires more time due to curing, which can take several weeks. It's important to factor in additional time if you plan to decorate the soaps or make multiple batches.
You May Also Like
- Easy African Black Soap Recipe - DIY
- How to Make Charcoal Soap at Home
- Homemade Soap Recipe For Men
- Charcoal Soap Benefits For Skin
- DIY Shea Butter Soap Bar at Home

Reviewed by:
Anjali Sharma
Anjali Sharma is a cosmetic & skincare formulation chemist with experience in developing products with over 5 years of experience in the Skincare and cosmetic industry.
Buy Products
-
 ₹439.00 ₹650.00
 -
 ₹449.00 ₹750.00
 -
 ₹449.00 ₹700.00
 -
 ₹249.00 ₹400.00
 -
 ₹229.00 ₹500.00


 Home
Home Search
 Shop
Shop Chat
Chat Profile